This is part two, the final part of configuring NGINX with SSL as a reverse proxy. Now that you have successfully installed NGINX and obtained a free SSL cert, you can proceed.
There is one important thing to note when configuring reverse proxy:
For each “subfolder” you want to act as a proxy to another server, you must have that server configured to listen on that subfolder.
This makes little sense in plain english so let’s review briefly, using CouchPotato as our example:
- Say I run CouchPotato on port 5050 of 192.168.2.100… well, if I were to attempt a reverse proxy to couch potato such as this:
# CouchPotato
        location /couchpotato {
                proxy_pass http://192.168.2.100:5050;
                proxy_set_header Host $host;
                proxy_set_header X-Real-IP $remote_addr;
                proxy_set_header X-Forwarded-For $proxy_add_x_forwarded_for;
  }
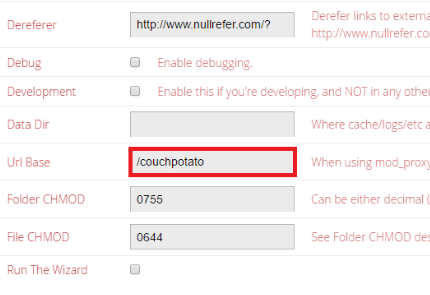
My CouchPotato server at 192.168.2.100:5050 must have a base_url of /couchpotato.
- I would then access CouchPotato at 192.168.2.100:5050/couchpotato internally
- If the BASE URL of your service or web server is not set the same as the location configured in your NGINX, you will get errors.
I struggled with this for at least an hour before I decided that there was nothing wrong with my configuration; just that my servers weren’t able to pass the data along properly the way I configured it.
Now that we have cleared that up, the rest is fairly simple.
1. Set the URL base of your services
- This will be different depending on which services you are running, so I would consult documentation for those specific services. For CouchPotato, I have shown above that you can change the URL base within the settings.
2. Create entries in NGINX config
- Edit your config file
- If you followed part one, you can continue with the below:
sudo nano /etc/nginx/sites-available/default
For each server or service you want to access through your reverse proxy, you must have an entry.
- I’ve decided to use MuxiMux as the root server of my proxy, so I don’t have to re-write the base url for that, and I can access it at the root of my FQDN.
# Muximux
        location / {
                proxy_pass https://192.168.2.200:8443;
                proxy_set_header Host $host;
                proxy_set_header X-Real-IP $remote_addr;
                proxy_set_header X-Forwarded-For $proxy_add_x_forwarded_for;
  }
Here for PlexPy, I did have to change the base URL, and so internally my PlexPy server is accessible at http://192.168.2.250:8181/plexpy
# PlexPy
        location /plexpy {
                proxy_pass http://192.168.2.250:8181;
                proxy_set_header Host $host;
                proxy_set_header X-Real-IP $remote_addr;
                proxy_set_header X-Forwarded-For $proxy_add_x_forwarded_for;
 }
Here, for Sonarr, I have the same server hosting this service on a different port. I had to change the Base URL for this as well, so it is accessible at http://192.168.2.250:8989/sonarr
# Sonarr
 location /sonarr {
    proxy_pass http://192.168.2.250:8989;
    proxy_set_header Host $host;
    proxy_set_header X-Real-IP $remote_addr;
    proxy_set_header X-Forwarded-For $proxy_add_x_forwarded_for;
  }
For headphones, it’s still the same thing. I did have a notably more difficult modifying the base URL for this, but the process is the same: Headphones must be accessible internally at http://192.168.2.250:8187/headphones
# Headphones
 location /headphones {
   proxy_pass http://192.168.2.250:8187;
   proxy_set_header Host $host;
   proxy_set_header X-Real-IP $remote_addr;
   proxy_set_header X-Forwarded-For $proxy_add_x_forwarded_for;
 }
OK, so as you can see, I’m doing the same thing here each time. It’s really straightforward.
3. Check configuration
You should always check your nginx configuration for errors after making any changes and/or restarting the service:
sudo nginx -t
As long as the configuration check passes, you should be ready to roll.
4. Restart NGINX
Finally, you only need to restart the service for the changes to take.
sudo service nginx restart
That’s it!
This isn’t the only way to configure a reverse proxy, but it is my recommended approach.
- To save yourself subdomain A records and obtaining multiple certificates, it’s easiest to simply add each of your services as a separate “directory” on the reverse proxy.
If you want to install any of these services or would like additional example configurations or more in-depth and targeted guides, you should check out https://www.htpcguides.com/
After all, I probably wouldn’t have gotten my reverse proxy working without paying them a visit. xD
Thank you for reading, I hope this helps.


1 Comment
How to install NGINX, get a free SSL certificate, and configure a reverse proxy (part one) – Tyler N. Woods · April 28, 2017 at 11:00 am
[…] Click here for part two. […]